This article describes two options for installing Smarty: on one server and on several servers.
Install Smarty and Components on a Single Debian 11 Server
To work, you will need SSH access to the root server. Installation will be carried out in console mode through terminal commands. If you need to execute a sudo command to obtain root privileges (the server administrator is responsible for installing sudo), then you must execute a command before starting the installation:
sudo su -
Installation of necessary packages
You need to establish dependencies through APT:
apt updateapt install git libtiff-dev libjpeg-dev zlib1g-dev libfreetype6-dev liblcms2-dev libwebp-dev python3-tk uwsgi uwsgi-plugin-python3 build3 redis-server-essential wget pwgen libmariadb-dev nginx python-is-python3 python3-pip python3-setuptoolsven 3-python
Next, you need to download the installation deb package:
dpkg -i smarty-base*.deb
For further work, you will need to install Smarty in a virtual environment and install the necessary libraries for work:
smarty_manage venv-install
smart_manage requirements
To adjust the number of open files in /etc/security/limits.conf, you need to specify at the end of the file:
*   soft nofile  200,000
*   hard nofile  200,000
Setting up Redis
If you install Smarty and Redis on the same server, add the following settings to /etc/redis/redis.conf:
stop-writes-on-bgsave-error no
save
Due to the fact that settings for the number of open files are not always accepted (see para. Installation of necessary packagesThis must be written in /etc/default/redis-server by changing the ULIMIT setting on 200000, and in /lib/systemd/system/redis-server.service by changing the LimitNOFILE value on 200000.
Reboot Redis:
sudo systemctl daemon reload
sudo service redis-server restart
Setting up a DBMS for Smarty
Smarty supports various databases, such as MySQL, MariaDB or PostgreSQL. For Debian Bullseye, MariaDB should be installed:
apt install mariadb-serverCreate a user to connect Smarty to the database and specify the password in the Smarty settings:
export DBPASSWORD='pwgen -s 16 1'
echo "CREATE DATABASE smarty CHARACTER SET = utf8;" | mysql -u root
echo "SET default_storage_engine=InnoDB;" | mysql -u root
echo "CREATE USER 'smarty'@'localhost' IDENTIFIED BY '$DBPASSWORD';" | mysql -u root
echo "GRANT ALL PRIVILEGES ON smarty.* TO 'smarty'@'localhost';" | mysql -u root
echo "FLUSH PRIVILEGES;" | mysql -u root
sed -i -e 's/PUT DB PASSWORD HERE/'$DBPASSWORD''/g' /etc/microimpuls/smarty/smarty.py
The last command replaces the "PUT DB PASSWORD HERE" line with the automatically generated password in the Smarty /etc/microimpuls/smarty/smarty.py settings file.
Due to the fact that settings for the number of open files are not always accepted (see para. Installation of necessary packages), this must be written in the file /lib/systemd/system/mariadb.service, changing the value of LimitNOFILE to 200000.
Preparation of uWSGI application server configuration
It is necessary to install a secret key for the operation of the internal protection mechanisms of Smarty:
export SECRETKEY='pwgen -s 32 1'
sed -i -e 's/PUT Random SECRET KEY HERE/'$SECRETKEY''/g' /etc/microimpuls/smarty/smarty.py
Now you need to activate the Smarty configuration for uWSGI:
ln -s /etc/uwsgi/apps-available/smarty.ini /etc/uwsgi/apps-enabled/smarty.iniYou also need to change the limit of open sockets for optimal uWSGI performance:
sudo su -c 'echo "net.core.somaxconn=64000" > /etc/sysctl.conf"sysctl -p
Then configure the correct directory rights for logs and files in Smarty:
sudo chown -R www-data:www-data /var/log/microimpuls
sudo chown -R www-data:www-data /usr/share/microimpuls
Preparation of Nginx Web Server Configuration
You need to activate the Smarty configuration for nginx:
sudo ln -s /etc/nginx/sites-available/smarty /etc/nginx/sites-enabled/smartyNext, you need to create a directory for cache and logs nginx:
sudo mkdir -p /var/cache/nginx/smarty
sudo mkdir -p /var/log/nginx/microimpuls/smarty
Set the rights to directories for logs and file downloads in Smarty:
chown -R www-data:www-data /usr/share/nginx/html/microimpulsThen configure the storage of the nginx cache in tmpfs:
sudo su -c 'echo tmpfs /var/cache/nginx/smarty tmpfs defaults,size=1200M 0 >> /etc/fstab'sudo mount -a
Installation of the licence key
At this stage, a license key is required.
To obtain the license key, you need to use the HW key - the print of the machine on which the Smarty is installed. To get it, you will need to change /etc/microimpuls/smarty/uwsgi/smarty.uwsgi setting.prod on setting.smarty. This is followed by a reboot of uWSGI:
sudo service uwsgi restartIt is necessary to wait about a minute to download the uWSGI and only then complete the work:
sudo service uwsgi stopWith each uWSGI restart, be sure to make sure that the old uWSGI processes are killed (can be checked by using uWSGI) ps aux | grep uwsgi and pay attention to processes with earlier start times, kill them with the help of sudo killall -9 uwsgi if necessary), and then in /var/log/uwsgi/app/smarty.log find the value of the HW key or use the command:
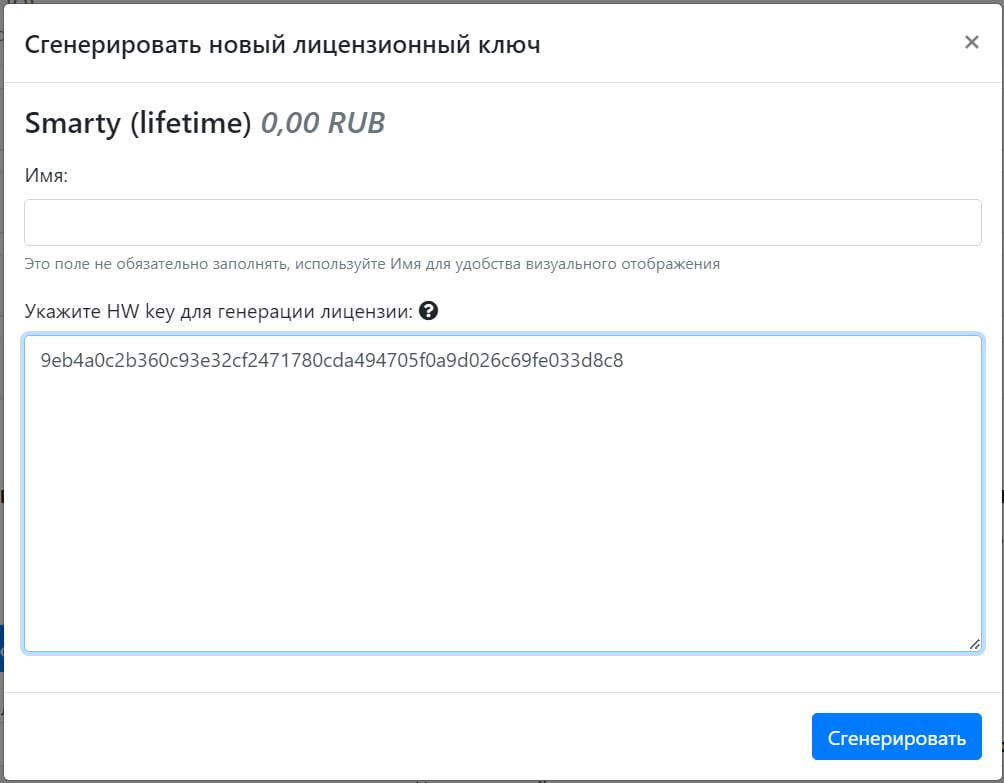
sudo cat /var/log/uwsgi/app/smarty.log | grep "HW key"The resulting HW key will be as follows (example):
9eb4a0c2b360c93e32cf2471780cda494705f0a9d026c69fe033d8c8
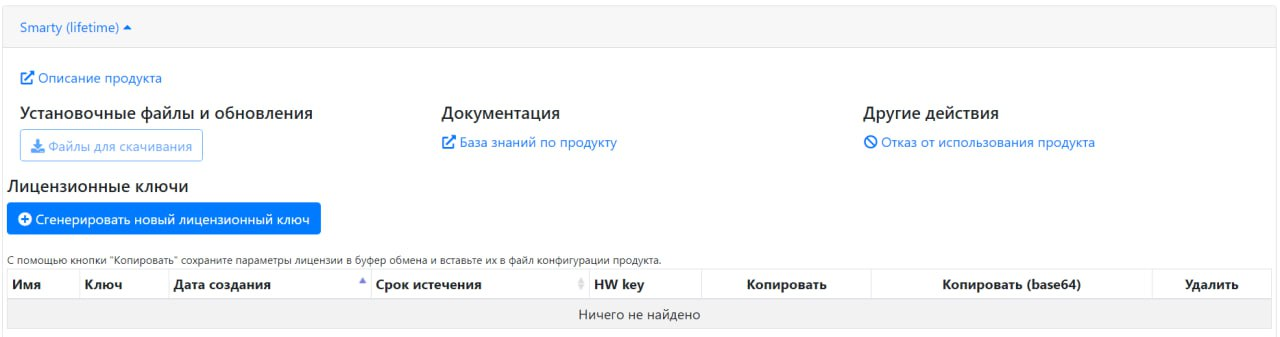
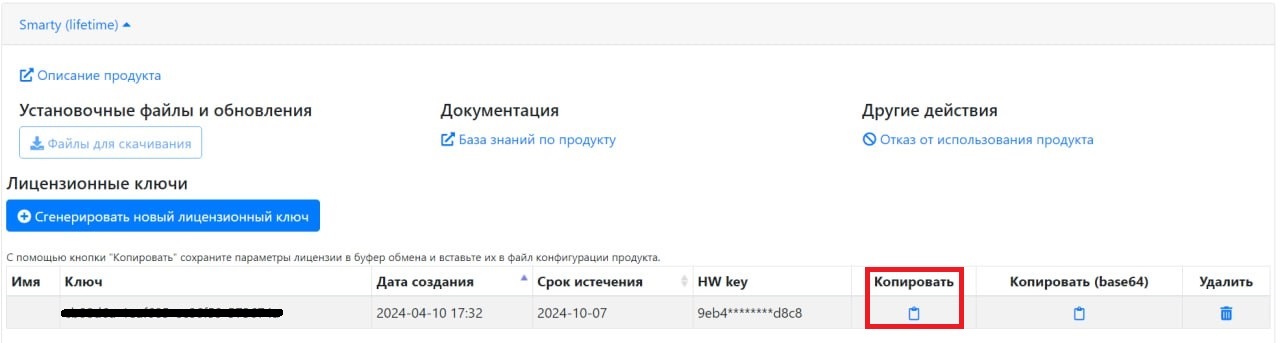
This value must be inserted into the appropriate field in the license generation window in the operator’s personal account (the button “Generate a new license key”).
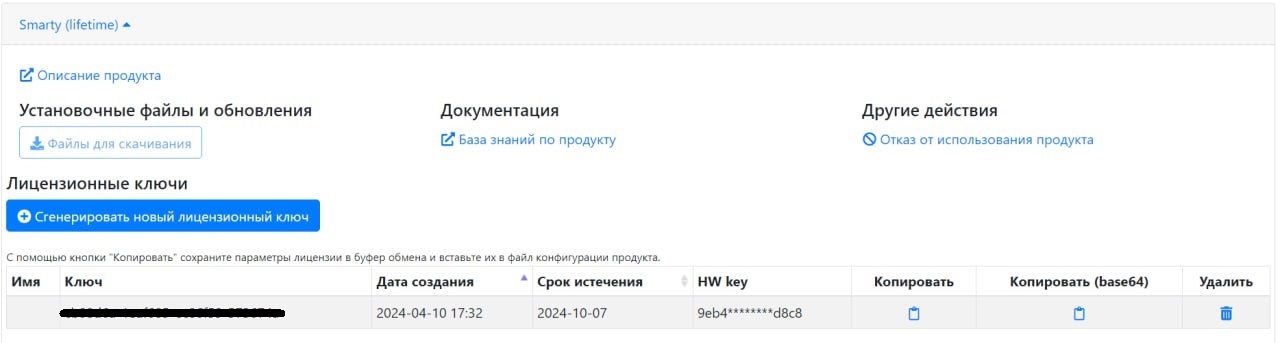
After that, copy the resulting key with all the license parameters by clicking the button under the column "Copy".

The key and settings must be written in the configuration file /etc/microimpuls/smarty/smarty.py.
License generation is called by the button “Generate a new license key” in the corresponding product in the personal account.
Copying of the license and all parameters is done using the “Copy” button in the line with the license key.
After adding the license configuration, you need to check that it is valid. To do this, you need to restart uWSGI and check the logs for no license errors and no Traceback logs due to the lack of additional Python libraries.
sudo service uwsgi restartBe sure to make sure old uWSGI processes are killed.
Log check:
sudo tail -n 1000 /var/log/uwsgi/app/*.log | grep "*** Starting" -A 100The last run log must not contain the "Key Incorrect" and "Traceback" errors.
Installation of the OBD scheme
You need to install a Smarty database schema using the built-in data migration mechanism:
sudo smart_manage migrateLaunch of services
Command to restart nginx and uWSGI with current settings:
sudo service nginx restart
sudo service uwsgi restart
Be sure to make sure old uWSGI processes are killed.
Installation of system settings and configuration
To quickly start using Smarty, there is a team that will set system settings and create examples of data: a set of channels, EPG, tariffs, streaming services and other objects necessary for the operation of the IPTV & OTT service. Team:
sudo smart_manage setup_initial_dataIn the future, you can edit them by adding your data.
Set up regular teams in Crontab
For the correct operation of Smarty and updating subscriber data, you need to configure the execution of commands on a schedule in Crontab, for this, you need to add the following lines at the end of the /etc/crontab file. Minimum set of regular teams:
*/1 * * * * root smarty_manage cache_channel_list --settings=settings.smarty
0 9.18 * * * root smarty_manage epg_import --settings=settings.smarty
0 3 * * * root smarty_manage clean_old_messages --days_count 3 --settings=settings.smarty
The first team updates the cache of TV channels. The second command imports EPG (teleguide) 2 times per day: at 09:00 and 18:00 server time. The third team clears old, undelivered text messages created 3 or more days ago.
Creating a user and getting started
Management of IPTV & OTT service in Smarty is carried out through the Web-control panel. You need to create a user with superadministrator rights to access the control panel.
This command will display the first 16-character generated password:
echo 'pwgen -s 16 1'
The team to create a superuser for Smarty:
sudo smart_manage createsuperuser
When creating a superadministrator, you must specify the previously generated password.
Attention! Important items to be filled:
- Login
- Password
- Password confirmation
The last command will display the generated password, it must be saved.
To correctly display images/styles in Django-admin, you need to fix the path to the Django package for the current version of Python in the /etc/nginx/sites-enabled/smarty* directory.
To do this, you need to update the paths for the following locations:
location ^~ /admin/media/css/2
alias /usr/local/lib/python7/dist-packages/django/contrib/admin/static/admin/css/;
}
location ^~ /admin/media/img/
alias /usr/local/lib/python2.7/dist-packages/django/contrib/admin/static/admin/img/;
}
location ^~ /admin/media/js/
alias /usr/local/lib/python2.7/dist-packages/django/contrib/admin/static/admin/js/;
}
location ^~ /media/static/admin/css/
alias /usr/local/lib/python2.7/dist-packages/django/contrib/admin/static/admin/css/;
}
location ^~ /media/static/admin/img/
alias /usr/local/lib/python2.7/dist-packages/django/contrib/admin/static/admin/img/;
}
location ^~ /media/static/admin/js/
alias /usr/local/lib/python2.7/dist-packages/django/contrib/admin/static/admin/js/;
}
For the installed Python version 3.9 (you can check the version of Python by the command python -V) in alias you should specify the new version 3.9 instead of 2.7. For this, you need to prescribe:
sudo sed -i -e 's/python2.7/python3.9/g' /etc/nginx/sites-available/smarty*
Restart nginx to apply changes:
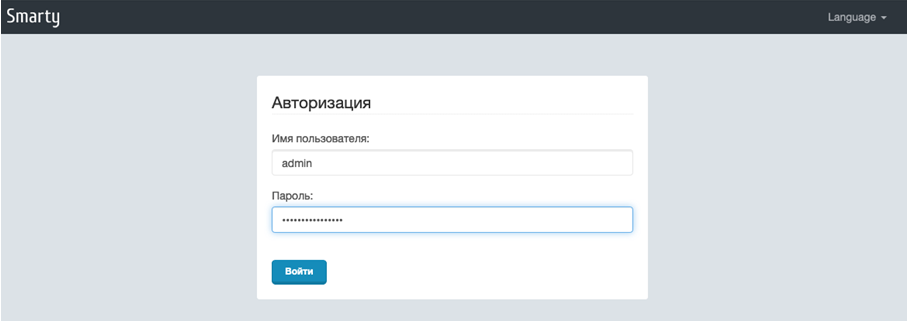
sudo systemctl restart nginxЗатем открыть в браузере панель управления Smarty http://X.X.X.X:8180 и авторизоваться созданным пользователем, в данном примере это admin и пароль, сгенерированный выше:
Setting up Smarty Portal
Now you need to install and configure the subscriber portal, connecting it with the Smarty API. Through the portal, the subscriber gets access to IPTV & OTT services.
After installing the portal, it is necessary to replace the location srv1 in the nginx configuration of the portal with mw1 and then restart the nginx configuration:
sudo sed -i -e 's/srv1/mw1/g' /etc/nginx/sites-available/portalsudo service nginx restart
After all these actions in the file /etc/microimpuls/portal/client.js in the api_key field, you need to enter the key, which can be obtained in the Smarty admin panel: General settings -> General settings Client -> TVMW API key:
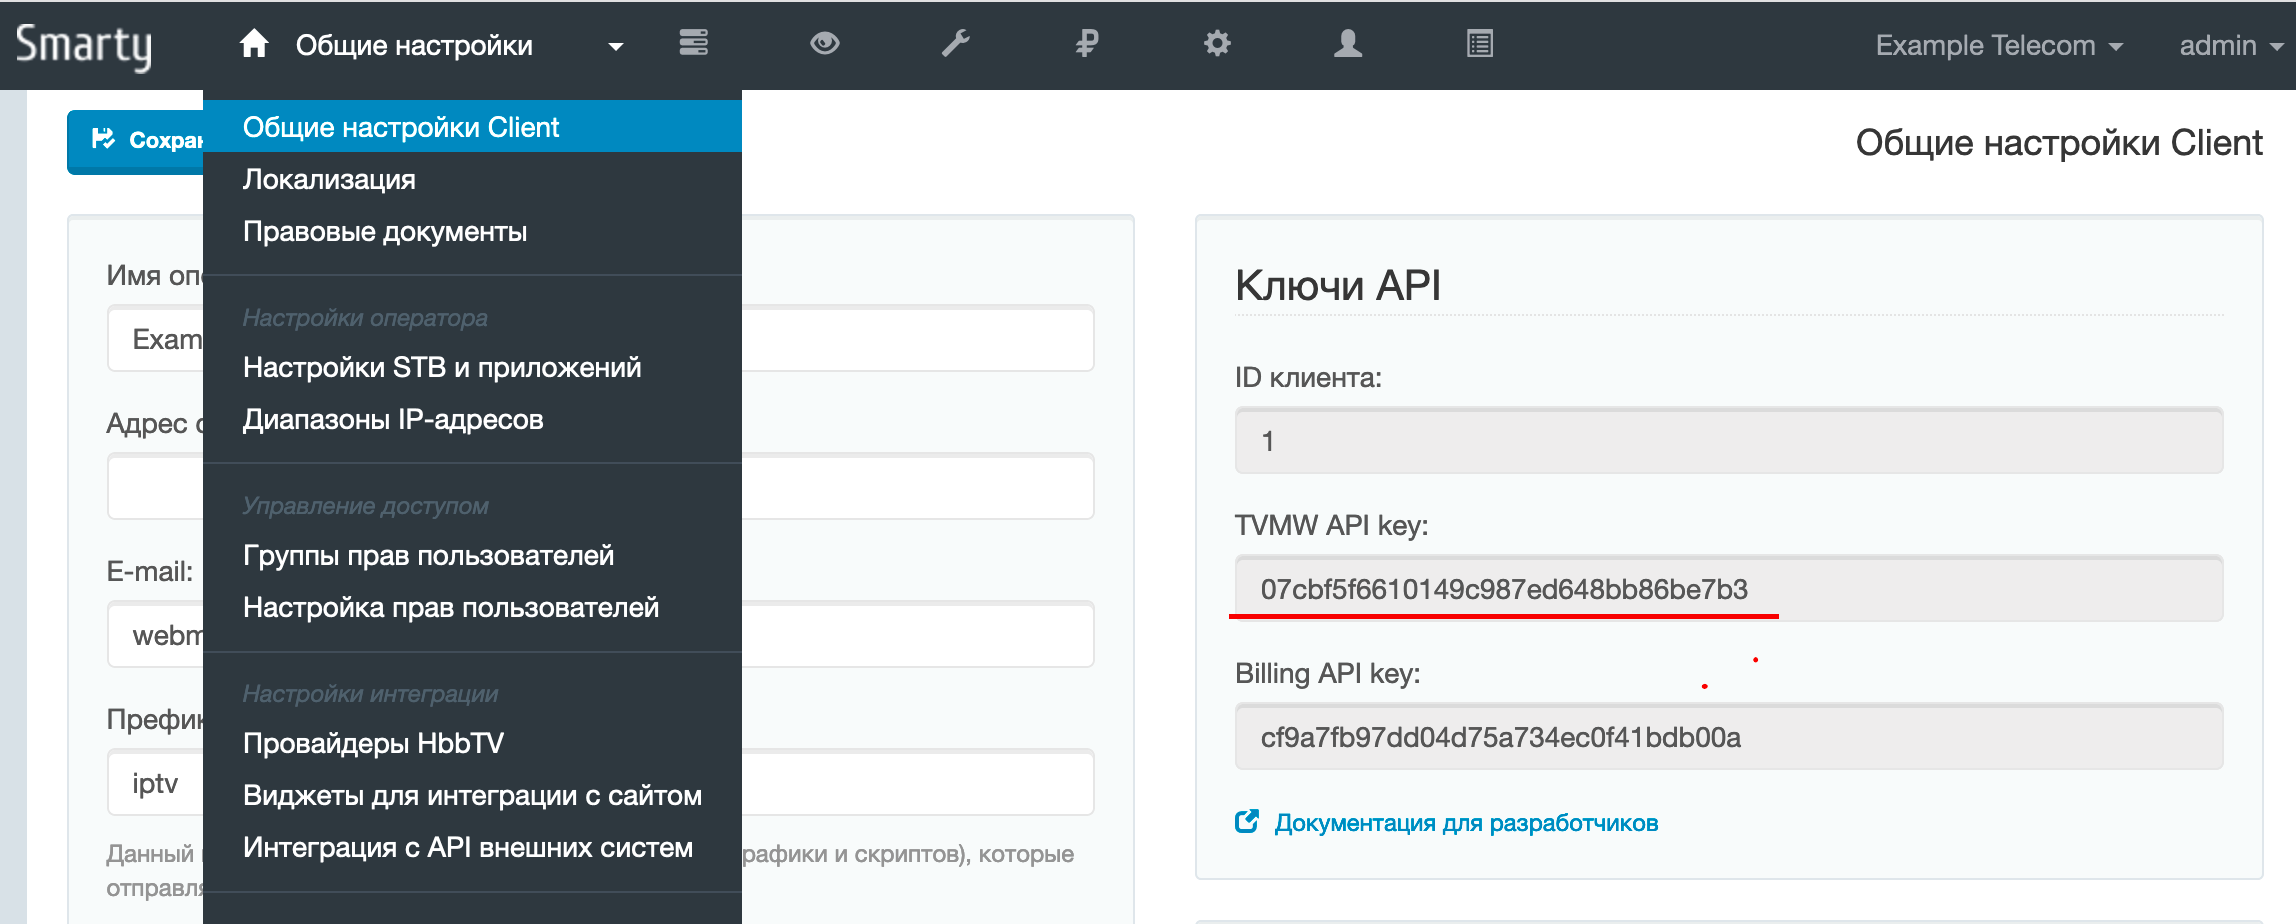
Use the following command (replace) TVMWAPIKE to your API key:
sudo sed -i -e 's/PUT API KEY HERE/'TVMWAPIkey'/g' /etc/microimpuls/portal/client.jsIn the Nginx configuration, a special location is set by default /api, which directs requests to the API in the uWSGI socket Smarty, so the standard parameter value api_url you don't have to change.
More information about the options for connecting the portal to Smarty and other settings can be found in the section Portal options.
After that, you need to open the portal in the browser to check the correct setting by entering the server IP address (port 80 by default). If done correctly, the authorization screen will appear:
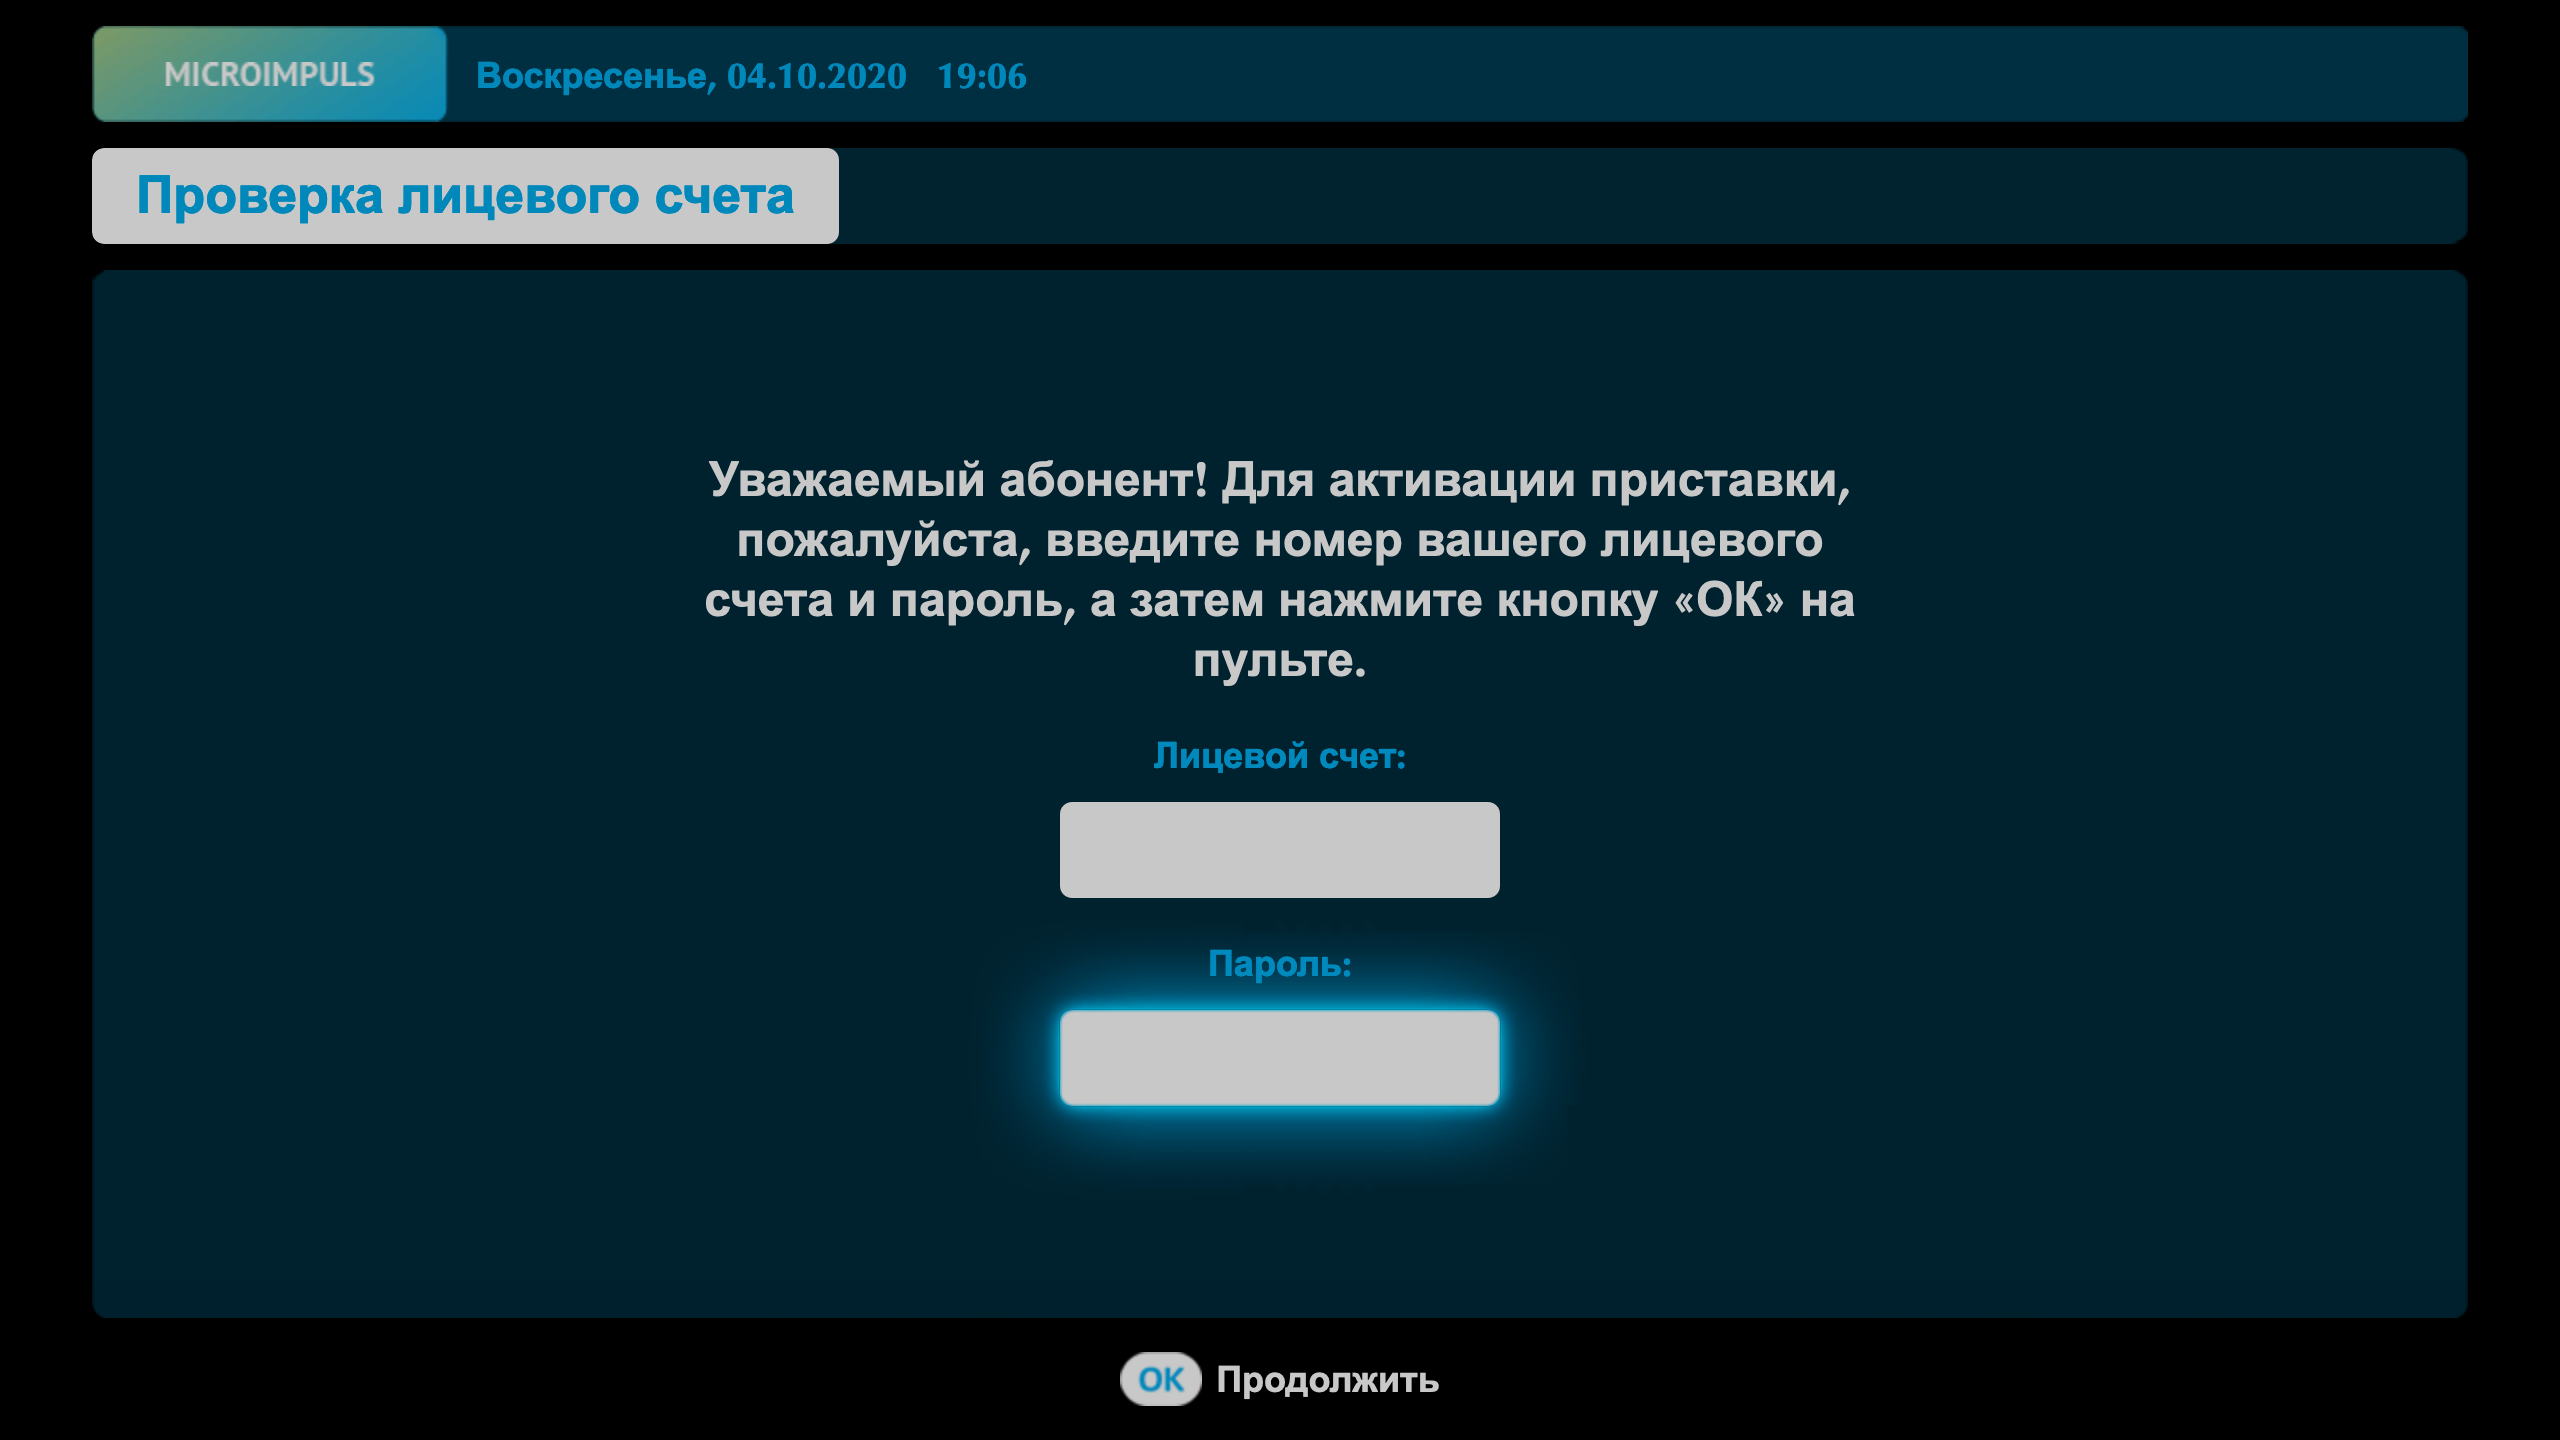
You can use the login / password of the demo account 123/123.
To open the portal on the TV set-top box, you need to specify in the device settings the same portal address as in the browser.
Install Smarty and Components on Multiple Servers with Debian 11
To work, you will need SSH access to the root server. Installation will be carried out in console mode through terminal commands. If you need to execute a sudo command to obtain root privileges (the server administrator is responsible for installing sudo), then you must execute a command before starting the installation:
sudo su -Installation of necessary packages
If your subscriber base is quite large and you are not sure that one server will withstand a large number of requests from subscribers, then we advise you to divide everything into four servers: a server with Redis, a server with MariaDB, a server with Smarty and a server with Portal, but you can combine several servers into one (for example, MariaDB + Redis, Smarty + Redis).
Commands that need to be registered on different servers:
Redis:
sudo apt update
sudo apt install redisdis
MariaDB:
sudo apt update
sudo apt install pwgen mariadb-serverSmarty:
sudo apt updatepython3-setuptools python3-venv
sudo apt install wget git libtiff-dev pwgen libjpeg-dev zlib1g-dev libfreetype6-dev liblcms2-dev libwebp-dev python3-tk uwsgi uwsgi-plugin-python3 libmariadb-dev python3-pip python-is-python3nginx-common nginx nginx-extras
Next, you need to download the installation deb-packs Smarty and Portal (you can get in private-roomand install on the server:
dpkg -i smarty-base*.debdpkg -i mw-engine_*.deb dpkg -i mw-template-*.deb
Change the number of open files in /etc/security/limits.conf. To do this, write the following at the end of the file:
*   soft nofile  200,000
*   hard nofile  200,000
Setting up Redis
After installation on a dedicated server, you need to configure Redis.
First, add parameters to /etc/redis/redis.conf:
stop-writes-on-bgsave-error no
save
Second, change the bind parameter from 127.0.0.1 on 0.0.0.0
Attention! Firewall should be configured so that you can only access from a server with Smarty.
Due to the fact that settings for the number of open files are not always accepted (see para. Installation of necessary packages), this must be forcibly specified in the file /etc/default/redis-server, changing the ULIMIT parameter to 200000, and in /lib/systemd/system/redis-server.service by changing the LimitNOFILE value to 200000.
Redis reboot:
sudo systemctl daemon reload
sudo service redis-server restart
Setting up a DBMS for Smarty
Attention! The following commands must be written under root rights.
Smarty supports various databases, such as MySQL, MariaDB or PostgreSQL. MariaDB should be installed for Debian Bookworm. In the section Installation of necessary packagesExamples of commands that can be used to install MariaDB. In the next step, you need to create a user to connect Smarty to the database and specify the password in the Smarty settings:
export DBPASSWORD='pwgen -s 16 1'
echo "CREATE DATABASE smarty CHARACTER SET = utf8;" | mysql -u root
echo "SET default_storage_engine=InnoDB;" | mysql -u root
echo "CREATE USER 'smarty'@'' IDENTIFIED BY '$DBPASSWORD';" | mysql -u root
echo "GRANT ALL PRIVILEGES ON smarty.* TO 'smarty'@'"; | mysql -u root
echo "FLUSH PRIVILEGES;" | mysql -u root
echo $DBPASSWORD
The last command outputs the generated password. This password will need to be entered when setting up Smarty, it must be saved.
Since MariaDB is installed on a dedicated server, you should change the IP address from which you can connect to the database. To do this, the file /etc/mysql/mariadb.conf.d/50-server.cnf should specify:
bind-address = 0.0.0.0Attention! Firewall should be configured so that you can only access from a server with Smarty.
Due to the fact that settings for the number of open files are not always accepted (see para. Installation of necessary packages), this must be written in the file /lib/systemd/system/mariadb.service, changing the value of LimitNOFILE to 200000.0.
Setting up Smarty
For further work, you will need to install Smarty in a virtual environment and install the necessary libraries for work:
smarty_manage venv-install
smart_manage requirements
It is necessary to install a secret key for the operation of the internal protection mechanisms of Smarty:
export SECRETKEY='pwgen -s 32 1'
sudo sed -i -e 's/PUT Random SECRET KEY HERE/'$SECRETKEY''/g' /etc/microimpuls/smarty/smarty.py
If the redis server is on a remote server smart.py shall be indicated:
CACHES = {
 'default':
 'Backend': 'core.cache.backends.RedisCache',
 'LOCATION': 'redis://ip-redis-server:6379/1',
 'OPTIONS':
 'PICKLE_VERSION': 5
 }
 },
 'protected':
 'Backend': 'core.cache.backends.RedisCache',
 'LOCATION': 'redis://ip-redis-server:6379/2',
 'OPTIONS':
 'PICKLE_VERSION': 5
 }
 },
}
Also, if MariaDB is on a dedicated server, it is necessary to prescribe the IP DBMS and the password that was generated at HOST. If a non-standard port, username, and/or database name are used, they must also be corrected.
You also need to enter the password from the database that was generated on the server with MariaDB PUT DB PASSWORD HERE.
Then activate the Smarty configuration for uWSGI:
sudo ln -s /etc/uwsgi/apps-available/smarty.ini /etc/uwsgi/apps-enabled/smarty.iniYou also need to change the limit of open sockets for optimal uWSGI performance:
sudo su -c 'echo "net.core.somaxconn=64000" > /etc/sysctl.conf"systemctl daemon-reloadsysctl -p
In the end, you should configure the correct directory rights for logs and files in Smarty:
sudo chown -R www-data:www-data /var/log/microimpuls
sudo chown -R www-data:www-data /usr/share/microimpuls
Set the rights to directories for logs and file downloads in Smarty:
chown -R www-data:www-data /usr/share/nginx/html/microimpuls
Preparation of the Nginx Web server configuration
You need to activate the Smarty configuration for nginx:
sudo ln -s /etc/nginx/sites-available/smarty /etc/nginx/sites-enabled/smarty
Next, you need to create a directory for cache and logs nginx:
sudo mkdir -p /var/cache/nginx/smarty
sudo mkdir -p /var/log/nginx/microimpuls/smarty
Set the rights to directories for logs and file downloads in Smarty:
chown -R www-data:www-data /usr/share/nginx/html/microimpuls
At the end, you should configure the storage of the nginx cache in tmpfs:
sudo su -c 'echo tmpfs /var/cache/nginx/smarty tmpfs defaults,size=1200M 0 >> /etc/fstab'sudo mount -a
Installation of the licence key
At this stage, a license key is required.
To obtain the license key, you need to use the HW key - the print of the machine on which the Smarty is installed. To get it, you will need to change /etc/microimpuls/smarty/uwsgi/smarty.uwsgi setting.prod on setting.smarty. This is followed by a reboot of uWSGI:
sudo service uwsgi restartIt is necessary to wait about a minute to download uWSGI and only after completing the work:
sudo service uwsgi stopWith each uWSGI restart, be sure to make sure that the old uWSGI processes are killed (can be checked by using uWSGI) ps aux | grep uwsgi and pay attention to processes with earlier start times, kill them with the help of sudo killall -9 uwsgi if necessary), and then in /var/log/uwsgi/app/smarty.log find the value of the HW key or use the command:
sudo cat /var/log/uwsgi/app/smarty.log | grep "HW key"
The resulting HW key will be as follows (example):
9eb4a0c2b360c93e32cf2471780cda494705f0a9d026c69fe033d8c8This value must be inserted into the appropriate field in the license generation window in the operator’s personal account (the button “Generate a new license key”).


Then copy the resulting key with all the parameters of the license (clicking the button under the column "Copy").
The key and settings must be written in the configuration file /etc/microimpuls/smarty/smarty.py.
License generation is called by the button “Generate a new license key” in the corresponding product in the personal account.
Copying of the license and all parameters is done using the “Copy” button in the line with the license key.
After adding the license configuration, you need to check that it is valid. To do this, you need to restart uWSGI and check the logs for no license errors and no Traceback logs due to the lack of additional Python libraries.
sudo service uwsgi restartBe sure to make sure old uWSGI processes are killed.
Log check:
sudo tail -n 1000 /var/log/uwsgi/app/*.log | grep "*** Starting" -A 100
The last run log must not contain the "Key Incorrect" and "Traceback" errors.
Installation of the OBD scheme
You need to install a Smarty database schema using the built-in data migration mechanism:
sudo smart_manage migrateLaunch of services
Command to restart nginx and uWSGI with current settings:
sudo service nginx restart
sudo service uwsgi restart
Be sure to make sure old uWSGI processes are killed.
Installation of system settings and configuration
To quickly start using Smarty, there is a team that will set system settings and create examples of data: a set of channels, EPG, tariffs, streaming services and other objects necessary for the operation of the IPTV & OTT service. Team:
sudo smart_manage setup_initial_dataIn the future, you can edit them by adding your data.
Set up regular teams in Crontab
For the correct operation of Smarty and updating subscriber data, you need to configure the execution of commands on a schedule in Crontab, for this, add the following lines at the end of the /etc/crontab file. Minimum set of regular teams:
*/1 * * * * root smarty_manage cache_channel_list --settings=settings.smarty
0 9.18 * * * root smarty_manage epg_import --settings=settings.smarty
0 3 * * * root smarty_manage clean_old_messages --days_count 3 --settings=settings.smarty
The first team updates the cache of TV channels. The second command imports EPG (teleguide) 2 times a day: at 09:00 and 18:00 server time. The third team clears old, undelivered text messages created 3 or more days ago.
Creating a user and getting started
Management of IPTV & OTT service in Smarty is carried out through the Web-control panel. You need to create a user with superadministrator rights to access the control panel.
This command will display the first 16-character generated password:
echo 'pwgen -s 16 1'
The team to create a superuser for Smarty:
sudo smart_manage createsuperuser
When creating a superadministrator, you must specify the previously generated password.
Attention! Important items to be filled:
- Login
- Password
- Password confirmation
The last command will display the generated password, it must be saved.
To correctly display images/styles in Django-admin, you need to fix the path to the Django package for the current version of Python in the /etc/nginx/sites-enabled/smarty* directory.
To do this, you need to update the paths for the following locations:
location ^~ /admin/media/css/
    alias /usr/local/lib/python2.7/dist-packages/django/contrib/admin/static/admin/css/;
}
location ^~ /admin/media/img/
    alias /usr/local/lib/python2.7/dist-packages/django/contrib/admin/static/admin/img/;
}
location ^~ /admin/media/js/
    alias /usr/local/lib/python2.7/dist-packages/django/contrib/admin/static/admin/js/;
}
location ^~ /media/static/admin/css/
    alias /usr/local/lib/python2.7/dist-packages/django/contrib/admin/static/admin/css/;
}
location ^~ /media/static/admin/img/
    alias /usr/local/lib/python2.7/dist-packages/django/contrib/admin/static/admin/img/;
}
location ^~ /media/static/admin/js/
    alias /usr/local/lib/python2.7/dist-packages/django/contrib/admin/static/admin/js/;
}
For the installed Python version 3.9 (you can check the version of Python by python -version command) in alias you should specify the new version 3.9 instead of 2.7. To do this, you need to prescribe:
sudo sed -i -e 's/python2.7/python3.9/g' /etc/nginx/sites-available/smarty*
Restart nginx to apply changes:
sudo systemctl restart nginxЗатем открыть в браузере панель управления Smarty http://X.X.X.X:8180 и авторизоваться созданным пользователем, в данном примере это admin и пароль, сгенерированный выше:
Setting up Smarty Portal
Now you need to install and configure the subscriber portal, connecting it with the Smarty API. Through the portal, the subscriber gets access to IPTV & OTT services.
After installing the portal, it is necessary to replace the location srv1 in the nginx configuration of the portal with mw1 and then restart the nginx configuration:
sudo sed -i -e 's/srv1/mw1/g' /etc/nginx/sites-available/portalsudo service nginx restart
After all these actions in the file /etc/microimpuls/portal/client.js in the api_key field, you need to enter the key, which can be obtained in the Smarty admin panel: General settings -> General settings Client -> TVMW API key:
Use the following command (replace) TVMWAPIKE to your API key:
sudo sed -i -e 's/PUT API KEY HERE/'TVMWAPIkey'/g' /etc/microimpuls/portal/client.jsIn the Nginx configuration, a special location is set by default /api, which directs requests to the API in the uWSGI socket Smarty, so the standard parameter value api_url you don't have to change.
More information about the options for connecting the portal to Smarty and other settings can be found in the section Portal options.
After that, you need to open the portal in the browser to check the correct setting by entering the server IP address (port 80 by default). If done correctly, the authorization screen will appear:
You can use the login / password of the demo account 123/123.
To open the portal on the TV set-top box, you need to specify in the device settings the same portal address as in the browser.